CRICUT: Design Studio - cutting an oversized paper doll
Date: 03:29Today I�m (finally) going to show you how I made the door sized paper doll from the paper doll teen scene cartridge for by daughter�s bedroom door.

I've been asked for a tutorial on how to do this ever since I posted the pictures of the one I created back in May of 2012.
Most recently I was contacted by a Cricut messageboard member by the name of Cookie who is struggling with some medical issues at the moment. So this is for you Cookie! Hope you are feeling better soon!
This can only be done using Design Studio or a Gypsy as they�re the only two Cricut programs that allow you to cut images that go outside the cutting boundary of the mat.
Teen Scene is made up of 5 different paper dolls all with different outfits and hair. Each doll has its own row on the keypad.
Here�s a picture of the doll that I�m going to be making. You�ll find her on page 41 of the handbook.

Her name is Chloe and I�m going to be making her with the Costume key and using the Wardrobe 2 option.
I�ll be making this doll approx. 50� in height. You need to decide now what you want your finished size to be.
Before we get started there�s a few things we need to set up first.
Go to the View menu and change to the 12 x 24 size mat.
Note: If you don�t have a 12 x 24 mat you can still create a large paper doll. It will just take a little longer to cut it. If that�s the case then leave your mat at 12 x 12.
Also in the View menu make sure you have Keep Preview as mat background checked.


Turn off the Shift key then press the Chloe button to add the top layer of the gown to the mat. (Marked as 3 above.)


Now select the next image to the left and again move it over on top of the other two images. They don�t have to line up. Just make sure it is inside the outline of the base layer.


Till next time!

I've been asked for a tutorial on how to do this ever since I posted the pictures of the one I created back in May of 2012.
Most recently I was contacted by a Cricut messageboard member by the name of Cookie who is struggling with some medical issues at the moment. So this is for you Cookie! Hope you are feeling better soon!
This can only be done using Design Studio or a Gypsy as they�re the only two Cricut programs that allow you to cut images that go outside the cutting boundary of the mat.
Teen Scene is made up of 5 different paper dolls all with different outfits and hair. Each doll has its own row on the keypad.
Here�s a picture of the doll that I�m going to be making. You�ll find her on page 41 of the handbook.
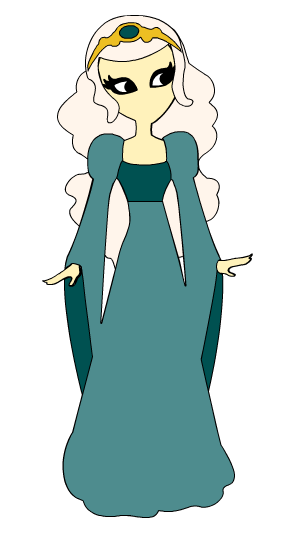
Her name is Chloe and I�m going to be making her with the Costume key and using the Wardrobe 2 option.
I've tried many different ways of making these oversize dolls and I believe that this way is the easiest!
Before we get started there�s a few things we need to set up first.
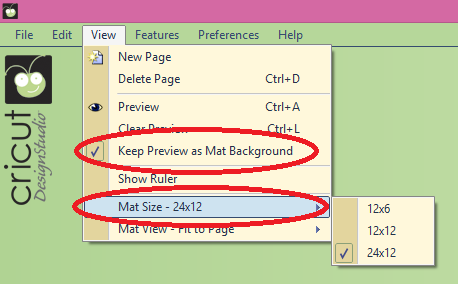
Go to the View menu and change to the 12 x 24 size mat.
Note: If you don�t have a 12 x 24 mat you can still create a large paper doll. It will just take a little longer to cut it. If that�s the case then leave your mat at 12 x 12.
Also in the View menu make sure you have Keep Preview as mat background checked.
I have my Default size set at 5�, but that�s purely so that I can see the image on the mat. You can set that at whatever size you like.
Finally, make sure that the Real Size box is unchecked. If you have Real size turned your layers won�t be sized in proportion to each other.
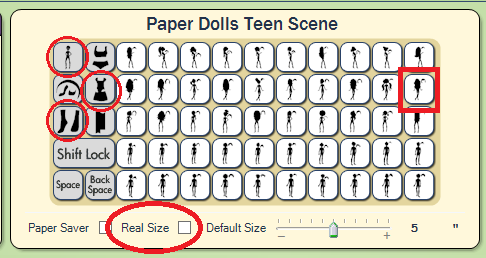
Teen Scene is made up of 5 different paper dolls all with different outfits and hair. Each doll has its own row on the keypad. Chloe is the 2nd row and the Costume key is the last button on that row. (I�ll call that the Chloe button.)
I�m initially going to add all the layers for this image to the one mat.
Once I've re-sized them I�ll move each layer to its own mat.
Once I've re-sized them I�ll move each layer to its own mat.
I have a picture of the handbook page below that shows which image I�m making and the order that I�ll place them on the mat.
The first layer is the Tiara.
Make sure the Shift Lock key on the DS keypad isn't pressed and select the Wardrobe 2 layer button. (Marked above as 1)
Click the Chloe button indicated above to add that image to your mat.
Press Enter to deselect that image (or click elsewhere on the mat.)
Press the Shift Lock button and then the Wardrobe 2 button.
Then press the Chloe button to add the bottom layer of the gown to the mat. (Marked as 2 above.)
Press Enter
Turn off the Shift key then press the Chloe button to add the top layer of the gown to the mat. (Marked as 3 above.)
Press Enter
Press the Shift key then press the first feature key. Press the Chloe button to add the Skin colour layer to the mat. (Marked as 4 above.)
Press Enter
Click the Shift key to turn it off and press the Chloe button to add the black layer. (This layer is for the pupils and eyelashes.)
Press Enter
Press the first feature key to turn it off.
Press the Shift key to turn it on then press the Chloe button to add the white layer to the mat. (This layer makes the whites of Chloe�s eyes.)
Press Enter
Press the Shift key to turn it off.
Press the Chloe button to add the main base layer to the mat. This layer creates the hair.
Now you have all the different layers of Chloe on the mat.
Next you need to move all the layers on top of each other.
Click on the outline of the second last image (press the ALT key if the handles don�t appear) and move her over to the right so that she is sitting (or is that standing??) inside the base layer.
Move her down slightly if necessary so that her head sits below the hair line and her feet finish just before the base layer�s feet.
Repeat the above for all the remaining images. You will have something that resembles this:
Don�t worry� you�ll unjumble her later!!
Now it�s time to resize your doll.
Drag a box around all the images. The base image should be the one that has the handles around it. (Which is why we added it to the mat last�)
Click the top left handle and move all the layers over to the top left corner of the mat.
Hold down the Ctrl key on your keyboard then using the bottom right sizing handle start dragging your mouse down to enlarge the images. Keep dragging until you can�t get the image any bigger.
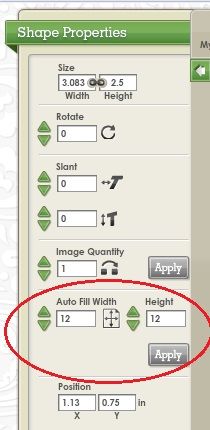
Take a look at the Height figure in the Shapes properties box. You eventually want that figure to be around the finished size you want your project to be.
At this point you probably won�t be able to see the resize handle.
Release the Ctrl key and without clicking off the images (so don�t click anywhere on the mat or press Enter) use the up arrow on your keyboard to move the images up.
Keep going until the bottom right resize handle is at the top of the DS mat.
(Remember, if your handles have disappeared � but you can still see the boxes around all the images � press the ALT key to turn the handles back on.)
Now, again hold down the Ctrl key and drag the bottom right handle down until you can�t drag any further. Check the Height box so you know how much further you have to go.
Let go of the Ctrl key and use the up arrow on your keyboard to move the images up to the top again.
Hold down the Ctrl key and keep re-sizing.
At some point the bottom right handle will not only disappear below the bottom of the mat, but also to the right. When that happens you�ll also need to use the left arrow on the keypad to move the shapes to the left size of the mat so you can grab the handle again.
Repeat these steps until the paper doll is the approximate finished height. It�s pretty well impossible to get this to be exactly the size you want as you can�t type that size in the Height box. If you do that, all the other layers will be size that height too�. So near enough has to be good enough.
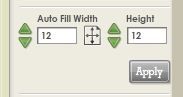
Here�s the Shapes Properties box showing a finished size of 50.002�.
And here�s how my DS screen looks:
Congratulations� you've re-sized your doll! Now you need to give each of those layers its own mat.
Don�t click on the mat yet!!! But you can let go of the Ctrl key now�.
While you still have all those layers selected use the arrow keys on your keypad to move the images down and to the right until you can see all of them on the mat � including the Tiara layer.
We currently have one page in our project. We need to have seven pages � one for each layer.
Click on the New Page icon 6 times to add 6 more pages.
These are the 3 toolbar buttons we�ll be using to move the layers to their own page:
Click on the first tab then click on the outline of the base layer.
Click the Copy button
Click on the last tab and click the Paste button
Go back to the first tab and press the Delete button. The base layer has now been moved to its own page.
To make it easier to know which layer is which it�s a good idea to rename the page title.
Click on the last layer then right click somewhere on the mat.
Highlight (or delete) �untitled page� and type in a new name.
Press Enter on your keypad to save the new name.
I use the name of the layer (Base) and the colour I�ll be cutting it (Blonde � as this is the colour of the dolls hair. You�ll obviously name it whatever colour you�re going to make her hair.)
Go back to the first page and select another doll layer by clicking on the edge of one of the hands.
Yes� it�s a jumbled mess!! How can you tell which is which layer? Basically you�ll only know by selecting a layer and moving it down using the keypad arrows until you can see the face.
You can use this picture as a guide:
And these are the corresponding tabs:
Using the arrow keys on your keypad move the image you have selected down until you can see the face.
This is the layer I selected:
I can see that there are no facial features which means that it is the white layer � Layer 6. Which means I�ll copy and paste it to the 6thpage.
Click the Copy button, then click on the 6th page tab.
Click the Paste button.
Rename this page to White.
Go back to the first page and delete the layer you just copied.
Now select another doll layer. Again, move it down so you can see which layer it is.
This time I have the Black layer. You can tell that by the small eye shapes.
Press the Copy button
Click on the 5th page tab then click the Paste button
Rename this page to �Black�
Go back to the first page and delete the shape you just copied.
Select the last doll layer which is the skin layer. You can tell that by its alien eyes!
Copy that layer and paste it to the 4th page.
Rename the page to Skin colour. (Or however you want to spell it!!)
Go back to the first layer and delete the shape you just copied.
Only three layers left� the two gown layers and the tiara/shoes.
Click on one of the gown layers and copy and paste it to its corresponding page.
Rename the page
Go back to the first page and delete that shape.
Select the next gown shape and copy and paste it to its corresponding page.
Rename that page.
Go back to the first page and delete that shape.
Now all you have left on the first page is the tiara and shoes.
Rename that page.
Here�s all the tabs renamed:
On the first tab you�ll see the three images that make up the Tiara layer. The two bottom images are for her shoes. But in this doll the gown covers the shoes, so it�s not necessary to cut those.
To stop the shoes from cutting we use the Hide Contour feature to hide them.
Click on the outline of the left shoe. The outline will turn red.
Click on the right mouse button and the menu will appear.
You�ll see at the bottom of the menu �Hide Selected Contour�
Click that and the outline of the shoe will turn pink.
Click off onto the mat and the outline of that shoe will turn light blue. This indicates that it is now hidden and won�t be cut.
Repeat the same process to hide the right shoe.
Finally�. It�s almost time to cut your doll!
Go to the Base layer tab and move the shaped down until you can see her head.
You�ll notice that there are two parts to her hair. You�ll want to hide one of those parts before you start cutting. For now click on the right hand shape and use the Hide Contour feature to hide that shape.
What�s that? It won�t let you hide the shape??? That�s because Design Studio won�t let you hide a shape that has been pasted. But that�s easily fixed.
Save your project (File, Save or File Save As if you haven�t yet saved it) then close that project. (File, close.)
(Don�t Exit out of Design Studio � just close the project.)
Now select File, Open and reopen your project. Hide Selected Contour will now be available on all your shapes again.)
Go ahead and hide the right hand hair image.
To make the most use of your 12x24 mat you should rotate your images 90 deg. (If you�re using a 12 x 12 mat you won�t have to do this step.)
Click on the doll shape that�s on the Base layer.
Move the doll up using the up arrow on your keyboard until her hands are around the 6� line. If you don�t do this the whole image might disappear off the mat when you rotate it.)
Click the Turn 90 button in the Shapes Properties box. (Click it a second time if nothing happens.)
The doll will now be shown sideways.
Now using the arrow keys on your keyboard position the first part of the image so it�s within the cutting boundary of the mat.
Load your mat with the appropriate colour card stock and send, load it into your Cricut (make sure you have the Teen Scene cartridge loaded) and press Cut.
When that section of the doll has finished cutting, unload the mat, carefully remove the image from the mat and place more card stock on the mat.
Move the base image on the mat so that a different section of the doll is inside the cutting boundary of the mat.
Make sure that you are re-cutting part of the previous section. That allows you to adhere the different sections together with tape.
Keep moving the image around on the mat and cutting until you have cut the entire layer.
It takes about 4 � sheets of 12 x 24 card stock to create this layer.
Once you have the base layer cut out move it around on the mat so you can see the hair section that you previously hid.
Click on that section, then right click and select Show Selected Contour.
Then select the section you have already cut, right click and select Hide Selected Contour.
You can now move the hair section inside the 12 x 12 boundary and send it to the Cricut to be cut.
And that�s the first layer cut!!
You now need to repeat those steps for each of the remaining layers. Remember to move the layer to the centre of the page first, then rotate it.
Good luck with cutting your oversize paper doll! And don�t forget� this process works for any of the shapes on any of the Cricut cartridges that can be used in Design Studio or the Gypsy. (That excludes the Imagine cartridges and any of the digital cartridges.)
Feel free to share a picture of your over-sized Cricut creation by clicking on the InLinkz link below!