Free etiketine sahip kayıtlar gösteriliyor. Tüm kayıtları göster

Wine glass box FREE Design Space cut file

Today I have a free cut file for you!


Have you etched a wine glass as a gift for someone?

Well, here's a box for you to package your finished project in. This box is made entirely of free shapes from the Design Space image library.

And because stemless wine glasses are so popular now you'll find a cut file for both stemmed and stemless glasses.

And I've included 3 different lid styles!

The box is very easy to assemble. Just remember to only cut the pieces you need.

You can either hide the parts you don't want to use in the Layers panel, or just click on the layers you want to cut when you get to the cut screen.

The box section is in two parts so that it will fit on 12" x 12" cardstock.

The stemmed box when assembled is 3.25" x 7.25".

The stemless box when assembled is 3.25" x 5".

Here's what you'll see when you open the project.


If you want the glass shape to be cut from the box be sure to select the entire box and the glass and click Attach. If you don't want the glass shape to cut (so you can use it for any other purpose) you can hide it in the Layers panel.

You can add any shape to the box. Just remember to attach it!

Please feel free to use this cut file for packaging products you sell.

However, please don't share or sell the cut file. Please send your friends to this blog to get the cut file themselves. Thanks!

Here's the link to the Design Space file.
https://us.cricut.com/design/#/canvas/34646499

Happy crafting!  �


Devamını Oku

Cricut Halloween Giveaway

(Sponsored Post)

While Halloween isn't really a big thing here in Australia (although its popularity is growing) I still enjoy seeing all the amazing crafting projects that it inspires!

Enter to win the Cricut Halloween Giveaway, where you could win a Cricut gift card for $50, $75 or even $100! Winning designs will be posted on the Cricut Facebook page! 

Do you have any spooky crafts you have made with your Cricut? Why not enter them? Haven't started yet? You have until October 30 so get busy. O

Here are some designs from the Cricut website to get your creative juices flowing. If you need to stock up on your Cricut supplies in order to give your designs that extra bit of spook, great news�Cricut offers Free shipping on orders $31+ with code HALLOWEEN31.


Good luck, and may the best ghost or goblin win! Submit your Entry to Cricut's Halloween Contest here


Happy crafting!  �


This website and its posts may contain affiliate links. If you purchase a product using the link I will receive a small commission.

I only participate in affiliate programs for products that I use and love.


Using the link is totally optional. If you don't wish to purchase through the link, you can go directly to Cricut.com and purchase from their shop. Please note there is no price difference to you between using the affiliate link and purchasing direct from Cricut.com. :)


Any commission I receive is used to offset the costs of maintaining this website (domain fees etc) and file/photo storage fees for files that I share with my readers. 


I have affiliates with Cricut.com and InLinkz �


Devamını Oku

CRICUT: Free file Friday

Each Friday on our Facebook group - Cricut Lovers Guide to Design Space we share a free file for you to download.

Here's what we've featured over the last two Fridays. 

First is a handy little Easel Card box. The box measures approx 5.5" by 5.5" and has a drawer. 

The easel part of the box is perfect for a calendar.


Next is a Tic Tac holder. The Design Space file includes two sizes for you to choose from. 


This week we have a guest designer. I've already cut and assembled the file.... and I'm confident you are going to love it!!

The file will be exclusive to our Facebook group so make sure you send a request to join!


Click below to join!


Happy crafting!  �

Devamını Oku

Easel card box


Welcome back to my poor neglected blog!

Just a quick post to share a Cricut Design Space project that's available for download from my Facebook group - Cricut Lovers Guide to Design Space

The project is an Easel card box. You can attach a calendar to the easel or add a photo. Whatever works for you!


You might need some assembly instructions.

Here's a diagram showing the different pieces in the design.


The easel is put together in the usual way. Fold the Easel card base in half, then fold again to create a triangle.

Take the Easel panel and adhere it to the from of the Easel base.


Here's a side view.


Fold drawer enclosure 1 along the score lines and adhere the two tabs. Apply tape to the sides as shown below.


Fold Drawer enclosure 2 and adhere the two tabs.


Drawer enclosure 2 is turned upside down and fits inside Draw enclosure 1 and is slightly smaller for that reason.


Make sure you put the two together so that you have an opening at the front.  Remove the tape from enclosure 1 and adhere the two together.


Fold the drawer layer along the score lines and adhere the tabs.


Slide the drawer into the enclosure. If you have trouble inserting the drawer because of the tabs on the inside of the enclosure, you can cut two strips and adhere them to the inside of the sides of the assembled enclosure.

Take the two handles pieces and adhere them on top of each other. This makes the handle stronger.
I used brads to attach the handle to the drawer.

Place the decorative shape piece on the top of the box and position so that the easel stands correctly.
I used pop dots to give mine some height and to hold the easel better.

Add the rest of the decorative layers and you're done!

Sturdy cardstock would be a good idea for this project. Especially if you're going to be adding anything with weight to the easel.

We'd love for you to post your finished project over on our Facebook page.

Here's the link again: https://www.facebook.com/groups/487705104684042/

You'll find the link to the file in the Photo gallery in the Free File Friday album.


Happy crafting!  �

Devamını Oku

CRICUT: Free File Friday

If you're a card maker you've probably been on the lookout for different types of card folds. I've been doing the same thing and was happy to find an amazing resource of templates created by Penny Wessenauer.

I am so happy to let you know that I have been in contact with Penny and she has given me permission to create cutting files for her templates and freely share them with you!

To get the ball rolling I have created a Centre Step Card and featured it as our Free File Friday card on Facebook over at Cricut Lovers Guide to Design Space.

Here's the card I made using the cutting file:


Some instructions:


The cutting file can currently only be used in Cricut Design Space with the Explore. Other versions of the file (Cricut Craft Room/SVG) may be available in the future.

To grab the Design Space file head over to the Cricut Lovers Guide to Design Space Facebook group. If you aren't a member you'll need to request to join.


You'll find the file in the Free File Friday photo album. Don't forget to "like" the photo if you download it. That way Paulette and I will know if you're enjoying the free files.

A huge thank you to Penny for allowing me to share her files with you in this way!


Happy crafting!  �

Devamını Oku

CRICUT: Free File Friday

It's Free File Friday over at


This weeks free Design Space file is based on an awesome project by Sam from Pootles Papercraft.

I've been trawling the internet looking for ideas for our Free File Friday and came across Sam's blog. Can I just say I want to make every... single... thing... she has shared!!!

I contacted Sam and asked if it was okay for me to create a Cricut Design Space cut file from one of her projects to share with all of you... and she said yes!

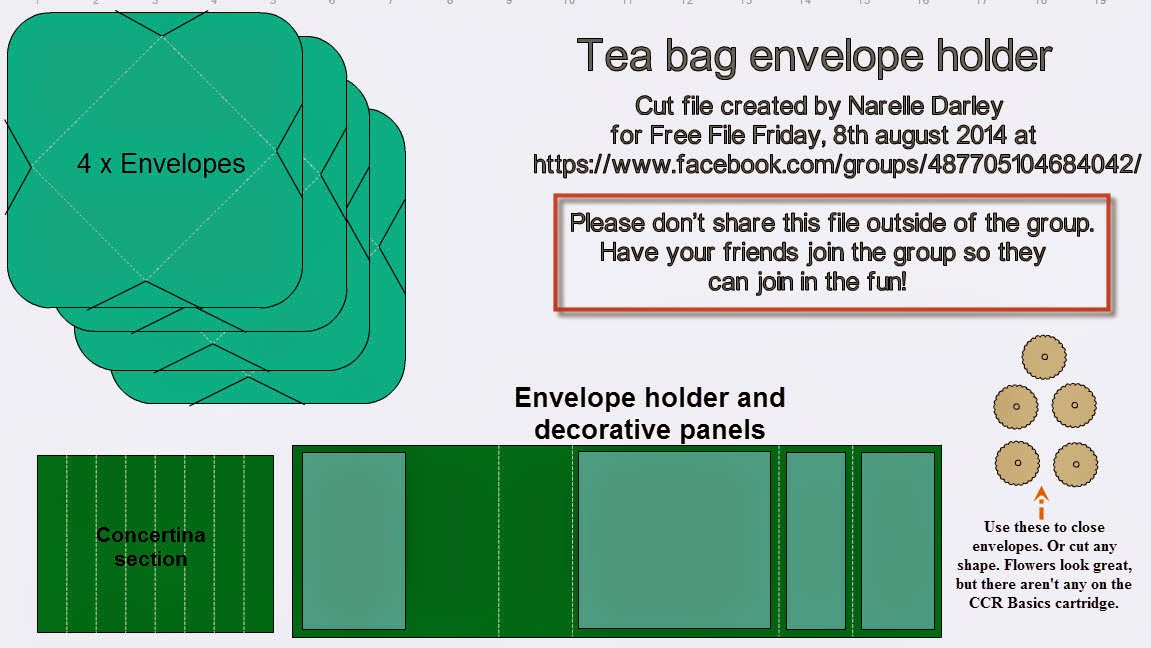
So, without further ado... let me introduce you to the Pootles Papercraft Tea Bag Holder Folder!


They will make the cutest gifts to give to friends or family. Each one holds 4 of the Twinings size tea bag envelopes. (Well, they used to be envelopes. Seems Twinings has cut costs and don't pack their teabags in those cute little envelopes anymore...)

Here's a side view of the holder...


Inside you'll find four of the cutest little envelopes each one containing a tea bag!


And here's Sams versions...


I found they also fit coffee sachets. And imagine one filled with Ghirardelli Chocolate Squares! Drool....


These are the pieces you'll find in the cut file. It might look complicated, but it really is a simple project to make!


You'll notice in Sams video she uses flowers as the envelope closures.  I create my files using the free Cricut Craft Room Basics cartridge so that anyone with an Explore can cut it but unfortunately there's no flower on that cart so I used a circle instead. But you can hide or delete those circles and add whatever shape you like in their place.

So, enough chit chat!! To grab the Design Space file head over to the Cricut Lovers Guide to Design Space Facebook group. If you aren't a member you'll need to request to join.

You'll find the file in the Free File Friday photo album. Don't forget to "like" the photo if you download it. That way Paulette and I will know if you're enjoying the free files.


And make sure you watch Sams video! She shows you exactly how to put this beautiful project together! Here's the link to the project: 


Please leave Sam some blog love while you're there. And if you happen to live in Wales, UK and need a Stampin' Up consultant... then look no further!

A Public Service Announcement.... you will most likely lose hours at Sams blog.... I watched video after video after video!! You have been warned! :)

I hope you enjoy this weeks file. 'Til next week....


Happy crafting!  �

Devamını Oku

CRICUT: Free Design Space Spring card

We've started something new over at the Cricut Lovers Guide to Design Space Facebook group.

Each Friday Paulette or I will be sharing a Design Space cut file that we've created.

This weeks file is a "Spring" card. This card folds flat to put in an envelope and springs up when taken out.


Here's a side view of the card.


Here's some instructions that might help when working out which layers to cut.


To grab the file you just need to be a member of our Facebook group. Once you join you'll find the file in the Photos section in the Free File Friday album.

The file should not be shared outside of the group. Instead, please have your friends request to join the group so they can also be a part of the fun! 

Here's the link to the group: Cricut Lovers Guide to Design Space


Happy crafting!  �

Devamını Oku

Wheeeeeeee! 1000 followers!!!

I made it to 1000 followers!!! 


A huge welcome to all my new followers. Hope you like what you find here!!

In celebration of this achievement I have decided that I will no longer require anyone to email me for my files. (Unless I decide to try for 2000 followers! LOL!)

From now on I will put a link to the files in the blog post. I'll also add a new tab to the top of the page so you can easily find any files I'm sharing.

Please remember: The files are for your PERSONAL USE ONLY and should not be shared via upload; email or in any Facebook/Yahoo/Patreon or other type of group/page. 

Please don't take credit for my work and claim it as your own and definitely do not charge for it!. The files are free for you to use in your projects. You don't have to say where you got the file but I sure would appreciate it if you did!

Remember all I ask is that you become a follower of my blog using Google Friend Connect before you download the files.


I have another cut file just about ready to go. Just need to fine tune a couple of things and pretty my sample up!

Sadly, it will be the last file I offer in the Gypsy format. Converting the file to a Gypsy file is fraught with frustration. Nothing seems to transfer over properly and the images don't cut at the size they are supposed to.

For example, for the file I am about to share this is what I had to do:
  • Export the CCR file as a Gypsy file
  • Open the Gypsy file in Design Studio (not Design Space)
  • Save the file as a Design Studio file
  • Fix up the sizing and placement problems that occurred during the export process
  • Resave the file as a Gypsy file
  • Export the file to my Gypsy
Only then did it cut out correctly.  I'd rather spend that time making new files to share! 

At least all you Gypsy owners will now know how to successfully convert my CCR files yourself!!

Stay tuned for the next free file!

(I'm also hard at work on the Art Philosophy cartridge codes...)

On a side note before I go.... The image at the top of this post is from Lyrical Letters. I have had that cartridge since it was released in 2009 (going by the info at Cricut.com) and I have never seen that image before!! If it wasn't for the search feature in Design Space I may never have found it! 


Happy crafting! �


Devamını Oku

CRICUT: Tissue box cover - Free cutting file

Hi everyone!

Today I have another Cricut cutting file to share with you. (Three actually....)

It's a cover for the square tissue boxes. Here's my sample box.


I cut this one using CCR as I haven't received my Explore yet. But it's on its way!! I can't wait till it arrives and I'm so glad I have some willing and able beta testers to test out my Design Space files for me! �

Here's the link to the Design Space file: https://us.cricut.com/design/#/canvas/project/17136334

Here's the link to download the CCR file: https://app.box.com/s/5o5knft7vb9z8lcxqm33

And for the Gypsy users here's the Gypsy file: https://app.box.com/s/yf2z6jfv9s0loakmf5c9

(I haven't tested the Gypsy file - just converted it in CCR).

The cut files are free!

Want more Design Space files like this? Come on over to our Facebook group. 
Just click the link below.

Cricut Lovers Guide to Design Space

We have free files to share with you every week!

I have had three people let me know that when they open the Design Space file the side panels layer (the red layer) appears then disappears. I've opened the file on several different computers at home and haven't had the problem. I'm pretty sure the problem is a Design Space bug.

If the same thing happens to you, you can either cut the side panels by hand... or add them to the file yourself using the square from Cricut Craft Room Basics. Either way, here are the measurements you'll need:

Side panels - 4 each of 4.25" x 4"
Lid panels - 4 each of 4.25" x 0.75"

To save you searching...the image code for the CCR square is #M3CF50. Make sure you have All Images or My Images selected before putting the code in the Insert Image search box.


I would appreciate it if you became a follower of my blog (if you aren't already) before you download the files. Just click on the blue "Join this Site" button at the top of the sidebar.


And if you want to know when I have more files to share, make sure you also put your email address in the "Follow by Email" box.


You may freely share these files, but please let everyone know where you got them. 
And please don't take credit for my work! :) 


I used the measurements from this tutorial at Splitcoast Stampers. Make sure you check it out for assembly instructions if you have any trouble!


So, some CCR instructions...

When you open the file in CCR your screen should look like this:


Depending on how much you've zoomed your mat in or out, you'll see less or more tabs than I have showing above. Just use the left and right arrows next to the layer tabs to see the other mats.

The file is made up of seven mats. From left to right the mats are in the order in which you should cut them: Base score, Base cut, Lid Score, Lid cut. You can cut the Lid Layer, Base layer and Lid sides in any order as there are no score lines on them.

If you are planning on hand scoring then you won't need to "cut" the Base score or Lid score layers.

I have the Cricut score tool but it does such a lousy job of scoring I don't use it. Instead I use the regular blade by changing the blade depth and the pressure settings. I cut mine using the Expression. For that machine I used the following settings for scoring:

Blade depth: 3
Pressure: Min
Material: Light cardstock (set at the Cut preview screen in CCR)

This cuts just deep enough to make an indentation on the cardstock without cutting all the way through. I'm using quite thick cardstock, so if you're using a thinner cardstock for your base make sure you do some experimentation of your own first!
  • Make sure that after you have done a scored layer you change your blade depth and pressure and material back so your next layer will cut correctly.
  • Also, don't unload your mat after you have done the scored layer. Just change your settings then cut the next layer.

  • If you move the base or lid around on the mat, make sure you also select the scoring layer and move it at the same time. The score lines are positioned in the correct spot on the cutting layer. 

Design Space instructions

If you're using the Explore score tool then just load your mat and let the Explore do its thing!

Assembly is very easy. 

On the two Base pieces, fold along all the score lines, then overlap and adhere one of the 1/2" pieces (C) to the end of the first piece (B).  Then overlap the remaining 1/2" piece (A) to the end of (D) to form the box.


For the lid, fold along all the score lines then adhere the tabs on the four corned inside the lid.


The remaining pieces just attach to the outside and top of the box.

You can just slip the lid over the box... or for a neater finish with no gaps adhere it with your choice of adhesive.


Have fun with the file. Feel free to post a pic of yours using the InLinkz tool below!


Devamını Oku

CRICUT: A free Box Card cut file for you

Hi everyone!

I have been working on a Design Space cut file for the very popular Box Card.

I've made it using just the score line and a box from Cricut Craft Room basics. Which means that anyone with an Explore can cut it!

I do have plans to make it into a Cricut Craft Room file for those (like me) that don't have an Explore. It would be so much easier if Cricut Craft room had a score line like Design Space!

Update: CCR file herehttp://thenon-craftycrafter.blogspot.com.au/2014/05/box-card-file-now-available-for-ccr-and.html


I have two versions of the file available. A 4 slot version and a 3 slot version.

The insert in this box card is very different to most box cards.


Paulette (aka Scrapalette) was testing out the file for me (I didn't have an Explore when I created the file) and she sent me a link to a blog post by Deb Valder from http://stampladee.com/ with a new way of creating the insert.

Here's the link to her post where you'll find her beautiful sample boxes and her video showing how to put the box together.


I contacted Deb to see if I could use her idea in my cut file and she said "Yes!"

I know you're going to love this new way of making the insert. It is so much easier to place it in the box.

Thanks so much Deb!! If you visit her blog please leave her some love and tell her I sent you!

Here's a couple of sample boxes all ready for decoration. Notice how nice and straight the inserts are sitting!


(These box cards are so hard to photograph!!)

So how do you get the files? Easy...
  1. Just click the blue Google Friend Connect "Join this Site" button to become a follower of this blog. (That's the first gadget at the top of the column to the right.)
  2. Click the orange box below to download the file
  3. Click on the link to open the file in Design Space. Make sure you do a Save As and give it a different name. That way you'll always have the original on hand.
  4. Read the assembly instructions below. You'll also find additional instructions in this post: http://thenon-craftycrafter.blogspot.com.au/2014/05/new-version-of-box-card-file.html

The file is totally free! But please do not share it!!! Share the link to this blog post instead. 


Want some instructions on putting the box together? Well, here you go.....


I designed the box to be 2.5" square and 5.5" tall. At that size you will get two boxes from one sheet of 12" x 12" cardstock.

I cut my decorative panels by hand. The small panels are 2.25" square and the large panels (I also put one on the back of the box) are 2.25" x 5.25".

If you want to make the box smaller (or larger if you're using 12"x24" cardstock) make sure you select both parts of the box before you resize. Otherwise the box and the inserts won't stay in proportion. To select both parts you can drag a selection box around them, or (if it's working) hold down the Shift key and click on each part in turn.

The main part of the box is very easy to assemble. Just fold along the score lines, put adhesive on the tab and adhere inside the box.


Here it is partly decorated.


Next fold the insert. When it's folded it should look like this:


Place adhesive on each of the small panels that will attach to the inside of the box. There will be adhesive on two panels on each side of the insert.

Next fold the insert in half along the score line I have marked in white in the picture below.


Here you can see where the insert will slide into the box.


Remove the adhesive from both sides of the insert and slide it into the box.


Make sure it is flush with the bottom of the box. I designed it so that when it's flush with the bottom it is just slightly shorter than the top of the box. It should fit snugly but still give you a little wiggle room.


Once it's in fully, flatten the box against the inserts.


Then open it one turn and flatten again.


Repeat until you've flattened all four sides.


Open the box up and your inserts should be sitting nice and straight like this:


The three slot version is a little trickier to put together as the insert is slightly smaller. But it's still much easier than the individual inserts that all the other box cards use!

Thanks to Paulette and Fran for testing out the file for me! �
And thanks again to Deb for the z-fold idea! 

I hope you enjoy the box card file.


Did I mention it was free????


Devamını Oku
Blogger tarafından desteklenmektedir.

© Copyright Handbooks and Design Space Image codes