CRICUT: Design Studio - Speeding up DS load time

This tutorial originally posted on my old Design Studio blog - 7th September 2010
 

As more and more carts are added to DS the time it takes to load increases. Here�s a way to speed up the loading time.

Thanks and credit to Tam from 
this and sharing it with the members of the cricut.com messageboard. 

Are there lots of carts that you don�t own, and think that you�ll never own? If so, you can remove them from DS. This means that DS doesn�t have to load them at start up.

Note: You won�t be actually deleting the carts permanently, but moving them to a different directory on your computer. That way, if you do buy one of those carts (or want to be able to see it in DS) you�ll be able to move it back into the Fonts directory and it will show up again.

And don�t worry � if you completely muck this up you can just uninstall DS and reinstall it again and all will be well!

Here�s how you do it:

  • Make sure DS is closed
  • Open up Windows Explorer.
Your screen should look something like this:


If you can't see the following Cricut Software folder in Program files, you may need to change your Folder viewing options:
  • Select Tools, Folder Options, then the View tab.
  • Make sure "show hidden files, folders and drives" is selected then click Apply, then OK to close that box.


I�m using Windows 7, so your screen might look a bit different if you�re using Vista or XP.
  • Navigate to: C: --> Program Files --> Cricut Software --> Cricut Designstudio --> Cricut Fonts
    You should see these 5 folders:

    Now we need to create a backup folder where we�ll copy all the fonts. This backup folder must not be inside the existing Cricut Fonts folder.  We need to go back up one directory.
    • Click the Cricut DesignStudio folder from the top of the screen.


    • Click the New folder button. If you don�t see a New folder button select File, New, Folder.

    Because we�re working with system files you may need to confirm this operation. 
    • Click the Continue button.
    • Overtype �New folder� with Backup Fonts (or whatever name you choose) 
    • Press Enter
    You should see these folders:


     Next we�re going to COPY all the contents from the 5 fonts folders into the Backup fonts folder.

    •  Click on the Cricut Fonts folder
    • Select Ctrl A (or Edit, Select All)

      Now all 5 Fonts folders should be selected.


      • Select Ctrl C (or Edit, Copy) The font folders will be copied to the computers clipboard
      • Go back to the Cricut DesignStudio folder
      • Click on the Backup fonts folder to open it. (It will be empty)

      • Select Ctrl V (or Edit, Paste)
      • Again, you may need to confirm this step. Click the Continue button
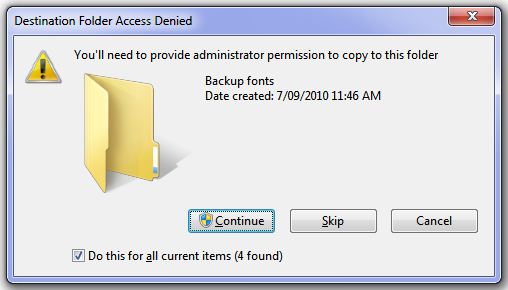
      The Fonts folders will now be copied to the new Backup Fonts folder.

      So now you have your backups created. Next you need to delete the fonts you don�t use from the original Fonts folders.
      • Navigate back to the original Cricut Fonts folder and open the CricutFontsA-C folder
      You�ll see all the carts from that folder. 
      • Hold down the Ctrl key and hover your cursor over a cart you want to delete until it�s selected. 
      • Keep holding down the Ctrl key down and continue to select the carts you want to delete. (Older versions of Windows may require you to Ctrl + click to select.)
      If you accidently select a cart, just move you cursor away from that cart, then hover over it again and it will be unselected.

      (You can also just delete the carts one by one if you find that easier.)
      • Once you�ve selected all the carts you don�t want DS to load, press the delete key.

      • Click Yes to confirm you want to delete those carts.
      • Again, you may need to confirm this operation. Click the Continue button.
      • Repeat the above steps for the 4 remaining Fonts folders, deleting any carts that you don�t want DS to load.
      Now go start DS and see how much faster it loads!


      Please note: If you open an existing file that uses a cart that you have removed from the cart library you will get an error message. You will need to close DS, copy the missing cartridge back into the cartridge library then reopen DS. Unfortunately the error message doesn't tell you the name of the cart that is missing.

      * * * * * * * * * * * * * * * * * * * * * * * * * * * * * * * * * * * * * * * * * * * 

      Adding carts back in

      The time will most likely come where you will purchase a new cart and want to be able to see and use it in DS. Here�s how to add carts back in.

      • Close DS
      • Navigate to: C: -->Program Files --> Cricut Software --> Cricut Designstudio -->  Backup Fonts
      • Then open the folder that contains the cart/s that you want to add back into DS and highlight them. (Again, use the Ctrl key if there�s more than one).
      • Once you have highlighted COPY your cart/s by selecting Ctrl C (or Edit, Copy). They�ll be copied to the clipboard.
      • Navigate to the original corresponding Font folder and select Ctrl V (or Edit, Paste).
      •  Click Continue at the inevitable message box:
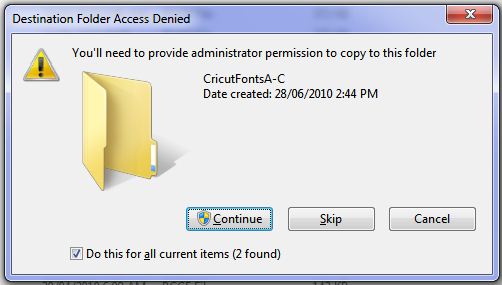
       
      Your carts will now reappear in the correct Fonts folder (assuming you selected the right one).

      • Open DS and those carts will now show up again.
      Remember, if you totally muck it up you still have your backup files plus if necessary you can uninstall DS and reinstall it.

      Devamını Oku

      CRICUT - CCR - Importing Design Studio and Gypsy files into CCR

      Originally posted on my old Design Studio blog - January 6, 2012

      Do you have a lot of Design Studio and/or Gypsy files that you would like to use in CCR? Well, here's how you go about importing them.

      1. Importing Gypsy files into CCR
      (This is for files that you or someone else have created using the Gypsy.)
      • Make sure CCR is not running. (You'll get a debug error message if you have CCR running and will have to select Abort then close CCR.)
      • Connect your Gypsy to your computer with the Gypsy USB cord
      • Power on the Gypsy
      • Open Cricut Sync


      • When your Gypsy has connected and has checked for updates click the OK button. (If your Gypsy hasn't been updated for a while you may want to do the updates first although you should be able to skip that process and proceed with the file transfer.)


      You will see a list of the files on your Gypsy


      Next you need to transfer your Gypsy file to your computer. 
      • Open Windows Explorer and select a location for your file 
      The default location for Cricut files is C:/Documents/Cricut/Projects but you can select any location on your computer, even the Desktop. I'll be using the default Projects folder.
      • Click the middle right hand button at the top right of the Windows Explorer screen to make that window smaller

      Next, position the Windows Explorer and the Cricut Sync windows so you can see both on the screen


      • Scroll through the list on the Cricut Sync window and locate the file you want to transfer to your computer
      • Highlight the file you want to transfer then click and drag it over to the Windows Explorer screen.

      You should see a symbol a bit like this as you move your cursor over the Windows Explorer screen.

      • When you have your mouse positioned over the Explorer window release the mouse button. Your Gypsy file will be copied to your computer and will show up in the list of files.


      • Check and make sure the file size isn't 0KB. If it does appear as 0KB the file won't import into CCR. If that's the case repeat the process above
      2. Now you need to import your file into CCR.
      • Exit out of Cricut Sync
      • Disconnect your Gypsy from your computer (or power it off)
      • Open CCR and login to your account
      • When you are at the Projects screen click the Import button

      • Navigate to the folder you copied your Gypsy file to

      • Click the file and press Open
      The file will appear at the top of your Projects list


      • Single click the file to select it and press the Open button (or double click next to the file name)
      The file will appear on your CCR mat.

      You will notice that the orientation of the file is different to how it appeared on your Gypsy. That's because the mat arrow on the Gypsy is on the left


      Whereas the mat arrow on the CCR mat is at the top.


      You can either leave your objects as they are or you can use the Rotate feature in the Shape Properties menu and rotate your objects 270�. 


      In the design above I would change my mat size to 12x12 before rotating the objects then change it back to 6x12 if I'm cutting it out on the Personal or the Create.
      • To change the mat size select the Options Menu
      • From the Project tab change the default machine to the Expression 
      • Change the Mat size to 12x12
      You may also find that your objects will be grouped. 
      • To make any changes to individual objects select the group by clicking anywhere on one of the objects then click the Ungroup button on the toolbar.

      That's it for importing Gypsy files. Now onto Design Studio files.


      3. Importing Design Studio files into CCR
      Currently, if you have the full version of Design Studio you can save your DS files as Gypsy files. If you haven't done that before here's how you go about it:
      • With your file open in DS select File, Save As

      • Highlight and delete everything inside the File name box

      • Type in a new file name. (It can be the same as the Gypsy file or something different)
      • Click on the Save as type box

      • Select Gypsy files (*.gypsy)
      • Click the Save button

      • Select File, Close. (You can leave DS open if you want. Just make sure the file is closed.)

      • Once you have your DS file saved as a Gypsy file follow the instructions above to import the file into CCR.
      Devamını Oku

      CRICUT: Design Studio - Paper Dolls Teen Scene layering

      Originally published on my old blog - 18 July 2012

      I recently posted about an almost life size Paper Doll Teen Scene that I made for my daughters room. I received a question from Nancy about the correct way to place the layers from this cart. She said:

      "I just bought this cartridge, and am having problems layering so the eyes come out right. I tried making the 5" tall doll, and it comes out looking like an alien. Can you tell me how to layer it so the eyes work? Nancy"

      So I thought I'd put together this tutorial. This will work whether you're using the cartridge directly in the Cricut or whether you're using Design Studio, Cricut Craft Room or the Gypsy.

      For this example I'll be using the first image key on the top row of the cartridge. You'll notice that all the dolls on the top row of the cartridge are all facing in the same direction. This means that you can mix and match any of the hairstyles and clothing items with any of the dolls on that row.

      The same applies to each of the other rows. So long as the doll is facing in the same direction you can use any of the hairstyles or clothing on any doll on that row.

        
      The first thing you need to do is look at the cartridge handbook.


      The order in which the images appear in the handbook is the order in which you will layer them - from the bottom to the top.

      The rest of the layers are wardrobe and accessories and are layered on top of the 4 other layers.

      The layer numbered 1 in the picture above should be cut in what ever colour cardstock you want the hair to be, as that is the only part of that layer that will be visible.

      Layer number 2 (the <Shift> of layer 1) should be cut from white cardstock as that layer only shows the white of the eyes.

      Layer number 3 would normally be cut in black. This layer only shows the pupils of the eyes and the eyelashes. You could cut this layer in blue, brown or green but note that the eye lashes will also be that colour.

      Layer 4 (the <Shift> of layer 3) should be cut in the colour that you want the skin to be.

      This is what your 4 layers will look like when you have cut them. At this point she does certainly look like an alien.


      Before you adhere them together move the fringe (you call them bangs, right??) so it's the last image. Like this:


      Now adhere your layers together. The image on the left will be the bottom layer. The white will go on top of that, then the black, then the skin tone and finally the hair piece.

      Now she will look like this:


      The rest of the layers are the dolls clothing (including shoes) and any accessories. Each doll has two clothing options. However, as I said above, you can select any outfit from any key on the same row and they will fit your doll.

      Here she is in her bikini:


      And her (I think) PJ's:


      I hope that helps anyone who is having trouble putting together these dolls!

      Have fun with this fantastic cartridge.
      Devamını Oku

      CRICUT: Design Studio - Paper Dolls Teen Scene door size doll

      Originally published on my old blog - 31 May 2012

      Ever since Paper Dolls Teen Scene was released I've wanted to do a huge one for my daughters bedroom door. 


      When it was added to Cricut Craft Room I made one that fitted the 12x24 mat. (You can't make them any bigger in CCR because it won't cut images that extend past the edge of the mat.) This is what she looked like:


      I've been waiting for it to be added to Design Studio so I could make a really big one and finally the update for it was released a week or so ago. (DS does allow you to cut images that go off the edge of the mat.) 


      Here she is:


      Other than her extremely unnaturally skinny legs I think she looks pretty good. She's not as big as I had planned but I only had 12x12 cardstock to work with. The Cgull 12x24 slab of "cardstock" I had is too thin plus I ran out of the colours I needed making the first doll. It took me about 2 days to finish her. It definitely wasn't as easy to do as I thought it would be.... but DD is happy!


      Devamını Oku

      Get ready for an onslaught of old tutorials from my Design Studio blog

      I'm currently trying to consolidate my three blogs into one. Tonight I'm going to be transferring as many Design Studio tutorials over here as I can.

      Apologies if you have subscribed to my emails..... But if I don't start now I'll never get it done!


      Devamını Oku

      Valentines Day Blog Hop

      If you're looking for some Valentines day project ideas then you might like to check out the Valentines Day Blog Hop happening on Saturday, February 8.

      I'm not in the hop (I have a reputation as the Non-Crafty Crafter to uphold) but some of my favourite people are!!

      1. RockinRenee - I came, I saw, I created.  
      2. HappyScrapper64 - Random Thoughts of a Scrapbooker
      3. gonescrappin - Col's Creative Corner 
      4. Hrvatica  - Croatian Crafter
      5. Scootingranny - Scootingranny's World
      7. Greenie8705 - Gina Beana's Crafts
      8. MariaJ - Stamp, Cut, Create!
      9. Di&Co - Creating Is Like Breathing
      10. Dragonfly50 - Designs by Dragonfly
      11. TiffysMom - Angie's Paper Passion
      12. *Violette* - Whimsical Treasures
      13. cricutaddicted - ScrappingForMoreFun
      14. LoriSjogren - The Singing Shell
      15. Scrapalette - Around the Block with Scrapalette
      Devamını Oku
      Blogger tarafından desteklenmektedir.

      © Copyright Handbooks and Design Space Image codes